


Getting started checklist in Edu
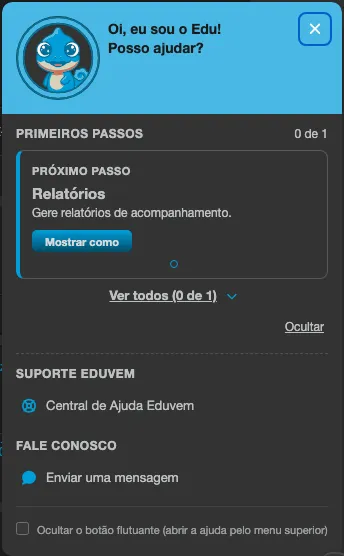
The Getting started checklist lives inside the panel of Edu, the floating help assistant. It shows what is already done and what is left to get your institution live, and offers a guided tour for each step.
The checklist steps
Section titled “The checklist steps”Steps are marked as done automatically, from the real data of your institution. You do not need to tick anything.
Stage 1
Section titled “Stage 1”| Step | Done when |
|---|---|
| Logo and colors | A logo of your own was uploaded. |
| Create content | The institution has at least one content of its own. |
| Publish | A content of your own was published. |
| Open a class | At least one active class exists. |
| Enroll | A participant (not an administrator) is enrolled in an active class. |
| Certificates | A certificate is configured, or a class with certification exists. |
Stage 2
Section titled “Stage 2”The Dashboard step (only when the institution has the Dashboard) and the Reports step appear after Stage 1 is complete. They become done when you watch the tour through to its last step.
While Stage 1 is not finished, the list shows a Later: line with the names of the Stage 2 steps. Once it is complete, the list shows Step 1 complete.
How to use the checklist
Section titled “How to use the checklist”- Click the Edu button to open the panel. The Getting started section shows your progress (for example, 2 of 6).
- The Next step card highlights the first pending step, with a short explanation and the Show me how button.
- Click See all to open the full list. Each row has a status mark and an action: Show (pending step) or Review tour (completed step).
- To see the step in practice, click Show me how (or Show). The Edu panel closes and the platform opens the matching screen, highlighting the important points one by one. Use Next, Back and Finish to move on. The counter shows where you are (for example, 1 of 2).
Some tours include a link to the Help Center, when the step happens on a screen that cannot be highlighted from the inside (such as the content editor and the Dashboard).
The number on the Edu button
Section titled “The number on the Edu button”While steps are pending, the Edu button shows a number: how many steps of the current stage are still missing. Above 9 it shows 9+. The number disappears when the checklist is hidden or complete.
Hiding and showing again
Section titled “Hiding and showing again”- Click Hide, at the end of the section, to hide the checklist. The preference applies to you, in this institution; other administrators still see the checklist.
- To bring it back, open the Edu panel and click the Getting started link at the bottom of the panel.
- When every step is done, the section becomes a single line, Done - Getting started, with the Hide option.
Turning the checklist on
Section titled “Turning the checklist on”An institution administrator turns the checklist on or off:
- Open the institution settings and go to the Help widget tab.
- In the Edu section, check the Getting started option.
- Save the tab.
The Getting started option only works while the Edu Assistant is turned on. To turn the checklist off for all administrators, uncheck the option and save.