


Custom registration fields
Besides the standard fields (name, email, CPF), your institution can create profile fields of its own to store information specific to your audience: company, job title, department, sector, school or any other data that makes sense for your operation. The configuration lives on the Profile tab, under Institution.
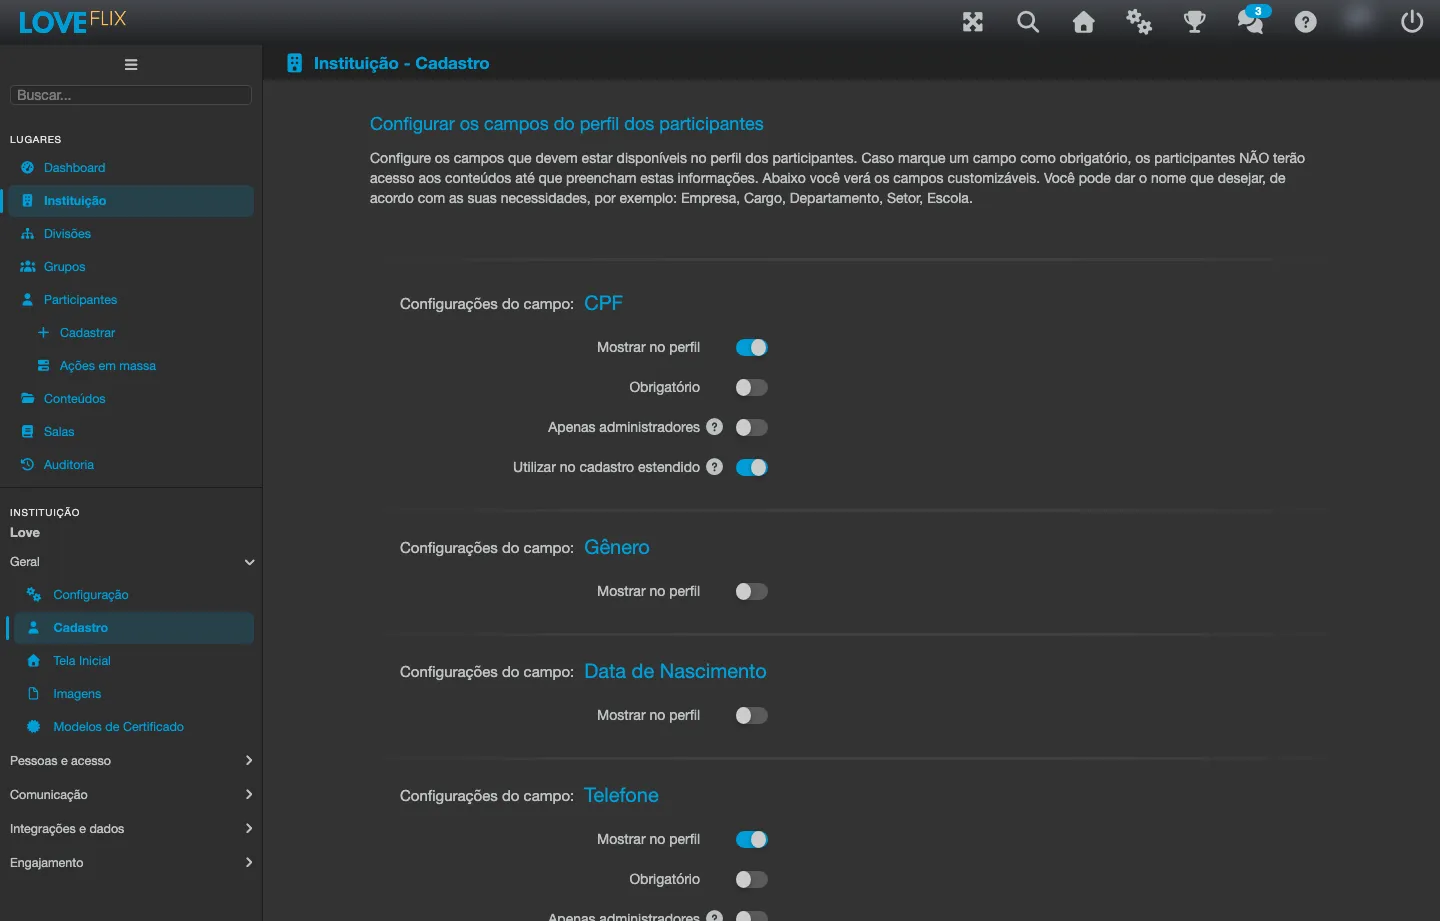
Creating a field
Section titled “Creating a field”- Under Institution, open the Profile tab and add a new field.
- Give the field any name you like in Field name (for example, “Department” or “Unit”).
- Decide whether it is Mandatory: with that option checked, the participant cannot access the content until the field is filled in.
- Check Show on profile so the field appears in the participant’s profile, available to fill in and consult.
- Optionally, check Admins Only (the participant sees the field in the profile, but only the administrator changes it) and Use in extended registration (the field goes into the bulk import spreadsheet, see below).
Fixed values (dropdown list)
Section titled “Fixed values (dropdown list)”A field can accept free text or, with the Use custom values option checked, a list of fixed values that you register yourself (for example, the units of your organization). With fixed values, the participant picks from the options instead of typing - it reduces typing inconsistencies in reports and filters.
Extended registration
Section titled “Extended registration”When importing participants in bulk through the mass operations, check the Use extended registration option to include in the import spreadsheet, in addition to the standard fields, the custom fields marked with Use in extended registration.
Profile fields available in the extended registration
Section titled “Profile fields available in the extended registration”Besides the fields you created, the extended registration also fills in eight profile fields that already exist in the platform: phone, city, address, postal code, date of birth, gender, country and state. They only appear in the registration if they are enabled on the Profile tab.
Four of them are checked at registration time and reject values outside the expected format:
| Field | What is accepted |
|---|---|
| Gender | F, M or O. Upper or lower case makes no difference. |
| Date of birth | yyyy-mm-dd, dd/mm/yyyy or dd-mm-yyyy. The date must actually exist and fall between 01/01/1900 and today. |
| Country | The two-letter code (BR, PT) or the country’s full name, in any of the platform’s languages (Brasil, Brazil, Brésil). In either case the registration stores the official code. |
| State | With the country Brazil, the state’s full name (São Paulo, Rio de Janeiro, Distrito Federal) or its two-letter abbreviation (SP, RJ, DF). Accents and capitalization make no difference, and the registration always stores the full name in its official spelling. Outside Brazil, the field accepts free text. |
The check happens at two moments. The date of birth is checked when the spreadsheet is loaded, row by row: a row outside the format is rejected with a message that names the field and the value (Field “Date of birth”: invalid date “…”. Accepted formats: …). Gender, country and state are checked when the import is confirmed, and the first row outside the format stops it, with the corresponding message (Invalid gender., Invalid country., Invalid state.). Fix the spreadsheet and resubmit: whoever was already registered is recognized as an existing participant, without duplicates.
In the extended registration form that the participant fills in themselves, the gender, country and state messages go further and already say what is accepted, instead of just rejecting the value.
Read-only profiles
Section titled “Read-only profiles”The institution can disable participants from editing their own data (Read-only profiles): in that mode, only the administrator changes the records. There is also the Full name non-editable option, which locks only the full name and keeps the other fields editable by the participant.
Labels per language
Section titled “Labels per language”The name of a custom field can be translated into your institution’s enabled languages, just like the Terms of Use. See Custom texts per language.