


Importing images or a PDF as slides
When the material already exists as a presentation, assembling the content slide by slide is repetitive: each lecture needs to be created, opened, and have its image uploaded separately.
The editor accepts the presentation in two ways: a single PDF file, or a selection of several images. In both cases, each page or image becomes an image-type lecture, in the right order - the order of the PDF’s pages, or the order of each image’s file name.
Before you begin: PDF or images
Section titled “Before you begin: PDF or images”A PDF is the simplest path: Eduvem accepts the file directly, with no need to generate one image per slide. Each page is rendered in your browser and becomes a lecture, in the order it appears in the file.
The most commonly used programs export to PDF directly from the menu, with no extra step:
- PowerPoint: File > Save As > PDF.
- Keynote: File > Export To > PDF.
- Google Slides: File > Download > PDF.
The presentation file itself - PPTX, PPT, Keynote or ODP - is still not accepted: export to PDF through one of the paths above and import the generated PDF.
If you prefer to upload as images (for example, to review or edit each slide before uploading), the usual path is still available:
- PowerPoint: File > Export > Change File Type > PNG. When prompted, choose to export all slides.
- Keynote: File > Export To > Images.
- Google Slides: File > Download > export each slide as PNG, or go through PDF first.
The program creates a folder with one file per slide, usually named Slide1, Slide2, Slide3 and so on. Those names are what defines the order in Eduvem when the import is by images, so it is worth checking before uploading.
Where to find it
Section titled “Where to find it”- In the admin menu, open Contents and choose the content you want to edit.
- Go to the Content tab to open the editor.
- In the tree on the left, click the topic that will receive the slides.
- Next to the Add new lecture to this topic button is a second, smaller button: Import slides.
How to import
Section titled “How to import”- Click Import slides.
- Eduvem asks “How should the slides be displayed?” and offers two options:
- Regular slides: the image appears in the body of the lecture, with room for text around it.
- Fullscreen slides: the image fills the participant’s screen, and any leftover area is filled with a blur of the image itself - ideal for exported presentations, which were already designed to fill the whole screen.
- In your computer’s window, select the images all at once (with
Ctrlon Windows orCmdon Mac, orCtrl+Ato select the whole folder) or a single PDF file. - Confirm and wait.
The choice applies to every slide in that import, but it is not final: each slide created can be changed afterward, individually, through that slide’s own Show fullscreen option (see below).
The images are uploaded one at a time, and the button itself shows the progress (for example, “Uploading image 12 of 40”). With many images this takes a few minutes.
When importing a PDF, the button first shows “Opening the PDF” and then “Processing page 12 of 40”, one page at a time - the rendering happens in your own browser.
When it finishes, Eduvem reports how many slides were created and takes you to the first one.
Slide order
Section titled “Slide order”In an import by images, the order comes from the file name, and the numbering is read as a number, not as text. In other words, Slide9 comes before Slide10, as expected, and not the other way around.
In an import by PDF, the order is simply the order of the pages within the file.
If the final order is not the one you want, the slides can be reordered normally in the tree, by dragging each one into place.
Fullscreen slides
Section titled “Fullscreen slides”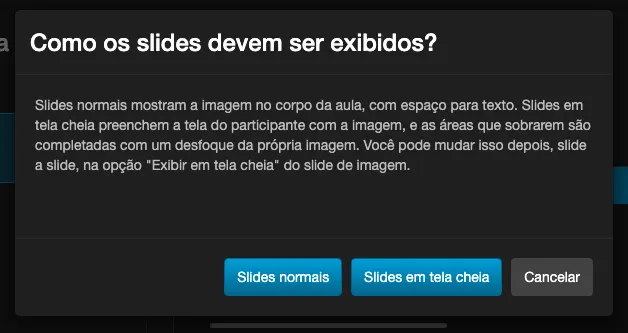
A slide marked as fullscreen takes up the participant’s entire area: the image is shown in full, with no cropping, and any leftover space (above and below, or on the sides, depending on the aspect ratio) is filled with a blurred version of the image itself - with no black bars.
To turn this on or off for a slide that has already been created:
- Click the image slide in the content tree.
- Check or uncheck the Show fullscreen option.
The option exists on every image slide, including ones created one by one - it is not exclusive to bulk import.
Each slide’s name
Section titled “Each slide’s name”Each lecture created gets a title in the format Lecture 1.3: Slide3, following the same pattern as lectures created manually: the topic’s position, the lecture’s position and the file name without the extension.
For a PDF, the title follows the format Lecture 1.3: File name - 03, with the page number at the end, padded with leading zeros according to the total number of pages (in a 3-page PDF it is 1, 2 and 3; in a 12-page one, 01 to 12).
If the file name is too long, it is shortened. Every title can be edited afterward, by clicking the lecture.
Limits and accepted formats
Section titled “Limits and accepted formats”Images
Section titled “Images”| Item | Value |
|---|---|
| Images per import | Up to 60 |
| Size of each image | Under 10 MB |
| Accepted formats | PNG, JPG, JPEG, GIF and WEBP |
If the selection goes over 60 images, none of them are imported: split the upload into two parts.
Files that cannot be accepted are reported grouped by reason, rather than one warning per file. The other files in the same selection are still imported normally. The possible reasons are:
- Format not accepted: the file is not PNG, JPG, JPEG, GIF or WEBP. BMP files fall under this: save as PNG or JPG and upload again.
- File too large: 10 MB or more. Reduce the image and upload again.
- Type not identified: the browser did not report what type the file is. Try selecting it again, or save it again as PNG or JPG.
| Item | Value |
|---|---|
| PDFs per import | One |
| File size | Under 50 MB |
| Pages | Up to 60 |
Unlike the import by images, a PDF outside the limit is refused entirely - there is no partial import:
- More than 60 pages: the whole import is refused. Split the PDF into smaller parts (for example, by module or chapter) and import each part separately.
- 50 MB or more: the PDF is refused. Export it again at a lower quality and upload it again.
- Password-protected: Eduvem cannot open the file in the browser to generate the slides. Remove the PDF’s password and upload again.
- A selection with a PDF and images together, or with more than one PDF: mixing is not allowed - Eduvem refuses the whole import and explains why.
Frequently asked questions
Section titled “Frequently asked questions”Can I upload a PDF directly? Yes. Eduvem accepts a single PDF per import: each page is rendered in your browser and becomes an image-type lecture, in page order. See the limits in Limits and accepted formats.
Can I upload the PowerPoint, Keynote or Google Slides file directly? No. Export the presentation as a PDF first - see how at the start of this article - and import the generated PDF.
Do the imported images become available for other content? Yes. They start appearing in the institution’s image library, alongside the other images uploaded through the editor.
Can I import more images into a topic that already has slides? Yes. The new slides are added to the end of the topic, without changing the ones that were already there.