

Social login (Google and LinkedIn)
Social login lets your participants sign in to Eduvem by clicking “Sign in with Google” or “Sign in with LinkedIn”, using an account they already have - with no new password to remember.
What you gain: fewer “I forgot my password” tickets, faster sign-up, and an entry point participants already know.
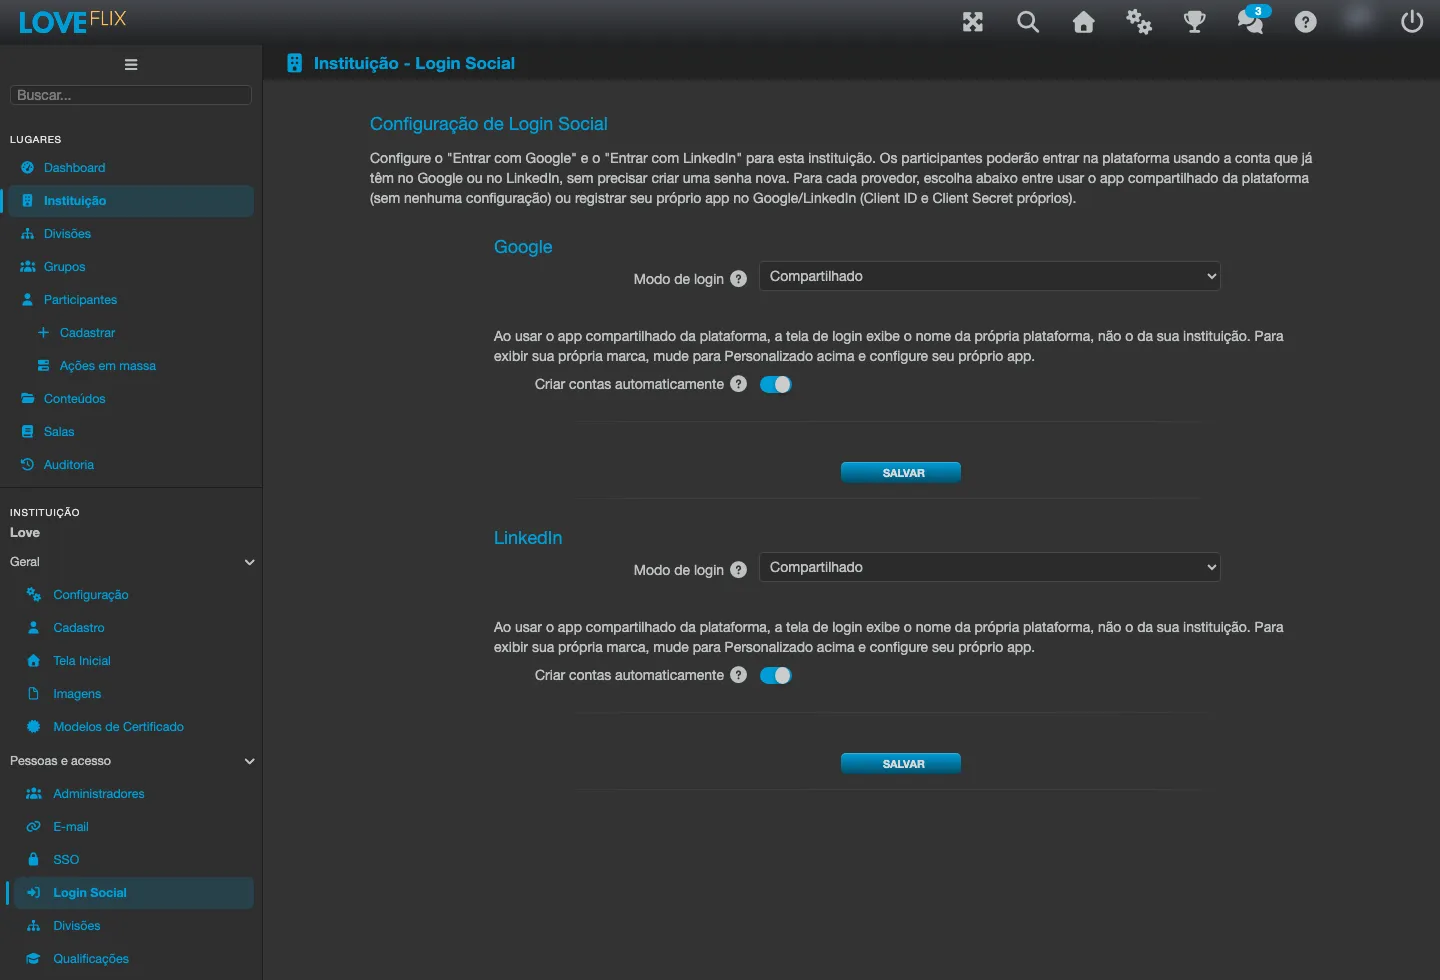
The setting lives under Institution, on the Social Login tab (next to the SSO tab), and is configured per provider: Google and LinkedIn are set up independently, each with its own block.
The three login modes
Section titled “The three login modes”Each provider has a Login mode field with three options. Choosing the right mode is the main decision on this screen:
| Mode | What happens | Does it need setup? |
|---|---|---|
| Disabled | The provider’s button does not appear on the login screen. | No |
| Shared | Your participants sign in through the platform’s shared app. | No |
| Custom | You register your own app with Google/LinkedIn. | Yes (Client ID and Client Secret) |
Once you’ve chosen the mode, click SAVE. The provider’s button starts appearing on your institution’s login screen.
Auto-create accounts
Section titled “Auto-create accounts”Available in both active modes, and on by default.
- On: the first sign-in with that provider automatically creates the person’s account (as long as your institution also allows self-registration). This is the expected behavior in most cases: whoever enables social login usually wants a first access to already provision the account.
- Off: social login only signs in to accounts that already exist and are linked to the provider. A brand-new person cannot sign in that way and needs to register the usual way.
Custom mode: using your own app
Section titled “Custom mode: using your own app”Only follow this part if you chose Custom. Selecting this mode makes the provider’s block show the Client ID, Client Secret, Scopes and Redirect URI fields.
Three terms come up along the way:
- Application (OAuth) - a registration you make with Google or LinkedIn authorizing Eduvem to authenticate your users. It’s free and takes a few minutes.
- Client ID and Client Secret - these are like a “username” and a “password” for that application. The provider generates both; you paste them into Eduvem. The Client Secret is confidential - treat it like a password.
- Redirect URI - the address the provider sends the participant back to after they authorize access. Eduvem shows this address ready-made in its own field; you copy and paste it into the provider. It needs to match exactly.
Step 1 - copy the Redirect URI
Section titled “Step 1 - copy the Redirect URI”On the Social Login tab, choose Custom on the provider you want and copy the Redirect URI shown in the block.
Step 2 - create the app with the provider
Section titled “Step 2 - create the app with the provider”Google (Google Cloud Console)
- Go to the Google Cloud Console and create (or reuse) a project.
- Go to APIs & Services > Credentials > Create credentials > OAuth client ID.
- For application type, choose Web application.
- In the Authorized redirect URIs field, paste the Redirect URI from Step 1.
- Save. Google shows the Client ID and the Client Secret - copy both.
LinkedIn (LinkedIn Developer Portal)
- Go to the LinkedIn Developer Portal and create an app.
- On the Products tab, request the “Sign In with LinkedIn using OpenID Connect” product.
- On the Auth tab, in the Authorized redirect URLs field, paste the Redirect URI from Step 1.
- Copy the Client ID and the Client Secret.
Step 3 - paste the data and save
Section titled “Step 3 - paste the data and save”- In the provider’s block, paste the Client ID and the Client Secret.
- Scopes: leave it blank to use the provider’s default scopes. This is recommended.
- Use Validate provider metadata for a quick check. It confirms the fields are filled in consistently and does not perform a real login test - the only definitive proof is doing a real sign-in.
- Click SAVE.
Testing
Section titled “Testing”- Open your institution’s login screen: the button for the provider you activated (and only that one) should appear.
- Sign in with an ordinary test account - do not use an administrator account, see below.
- Sign out and sign in again with the same account: you land back on the same record, because the link is permanent.
If something goes wrong (you cancel on the provider, or the setup is incomplete), the login screen returns with a generic failure notice. Just sign in the usual way and review the configuration.
What Eduvem does for security
Section titled “What Eduvem does for security”- Administrator accounts don’t use social login. Accounts with elevated privileges (platform administrator, super administrator, owner) only sign in with username and password. That’s why you should always test with an ordinary account.
- An email the provider confirms can link to an account that already exists. If a participant already has a password-based account with the email
person@example.comand does their first social login with an account whose email the provider itself confirms is the same, that login gets linked to the existing account - so anyone who already had an account starts using social login without re-registering. Emails the provider does not confirm never link. - The Client Secret stays encrypted. It is stored encrypted, is never returned in any query, and is hidden from audit logs.