


Live classes - Teams, Meet, Zoom, external URL and In person
A live class is a scheduled meeting inside a class, shown to the participant at the right point in the content sequence - without leaving the course. Each live class has a provider:
| Provider | What it is | Needs setup? |
|---|---|---|
| Microsoft Teams | Eduvem creates the meeting on your organization’s Microsoft account. | Yes - Azure AD / Entra credentials (below). |
| Google Meet | Eduvem creates the meeting on your organization’s Google Workspace. | Yes - a Google service account (below). |
| Zoom | Eduvem creates the meeting on your organization’s Zoom account. | Yes - a Zoom Server-to-Server OAuth app (below). |
| External URL | You paste the link from any meeting service (Webex, Jitsi, a fixed room, etc.) - Eduvem just displays and delivers the link at the right time. | No - always available. |
Eduvem does not provide a shared Microsoft, Google or Zoom account: with Teams, Meet or Zoom, the meeting runs on your own institution’s account.
How it works
Section titled “How it works”The feature has three parts:
- Configuration (once, per institution): on the Live Classes tab of the institution settings, each provider has its own credentials sub-tab - Microsoft Teams, Google Meet and Zoom. Configure only the one(s) your organization uses; the External URL option needs no configuration at all.
- In the content editor: the author adds one or more Live Class lectures to the modular content - a placeholder in the sequence, with no date or time yet. The type works for any provider: the platform, date and link are set in the class.
- In the class: the class’s Live Classes tab is where the meeting actually gets scheduled - with provider, subject, date, time and duration. When scheduling, you choose which content lecture the meeting belongs to (or leave it as No lecture, for a standalone meeting). Each class can have several live classes scheduled, and the same content can be offered in different classes with different meetings.
Configuring Microsoft Teams (IT team)
Section titled “Configuring Microsoft Teams (IT team)”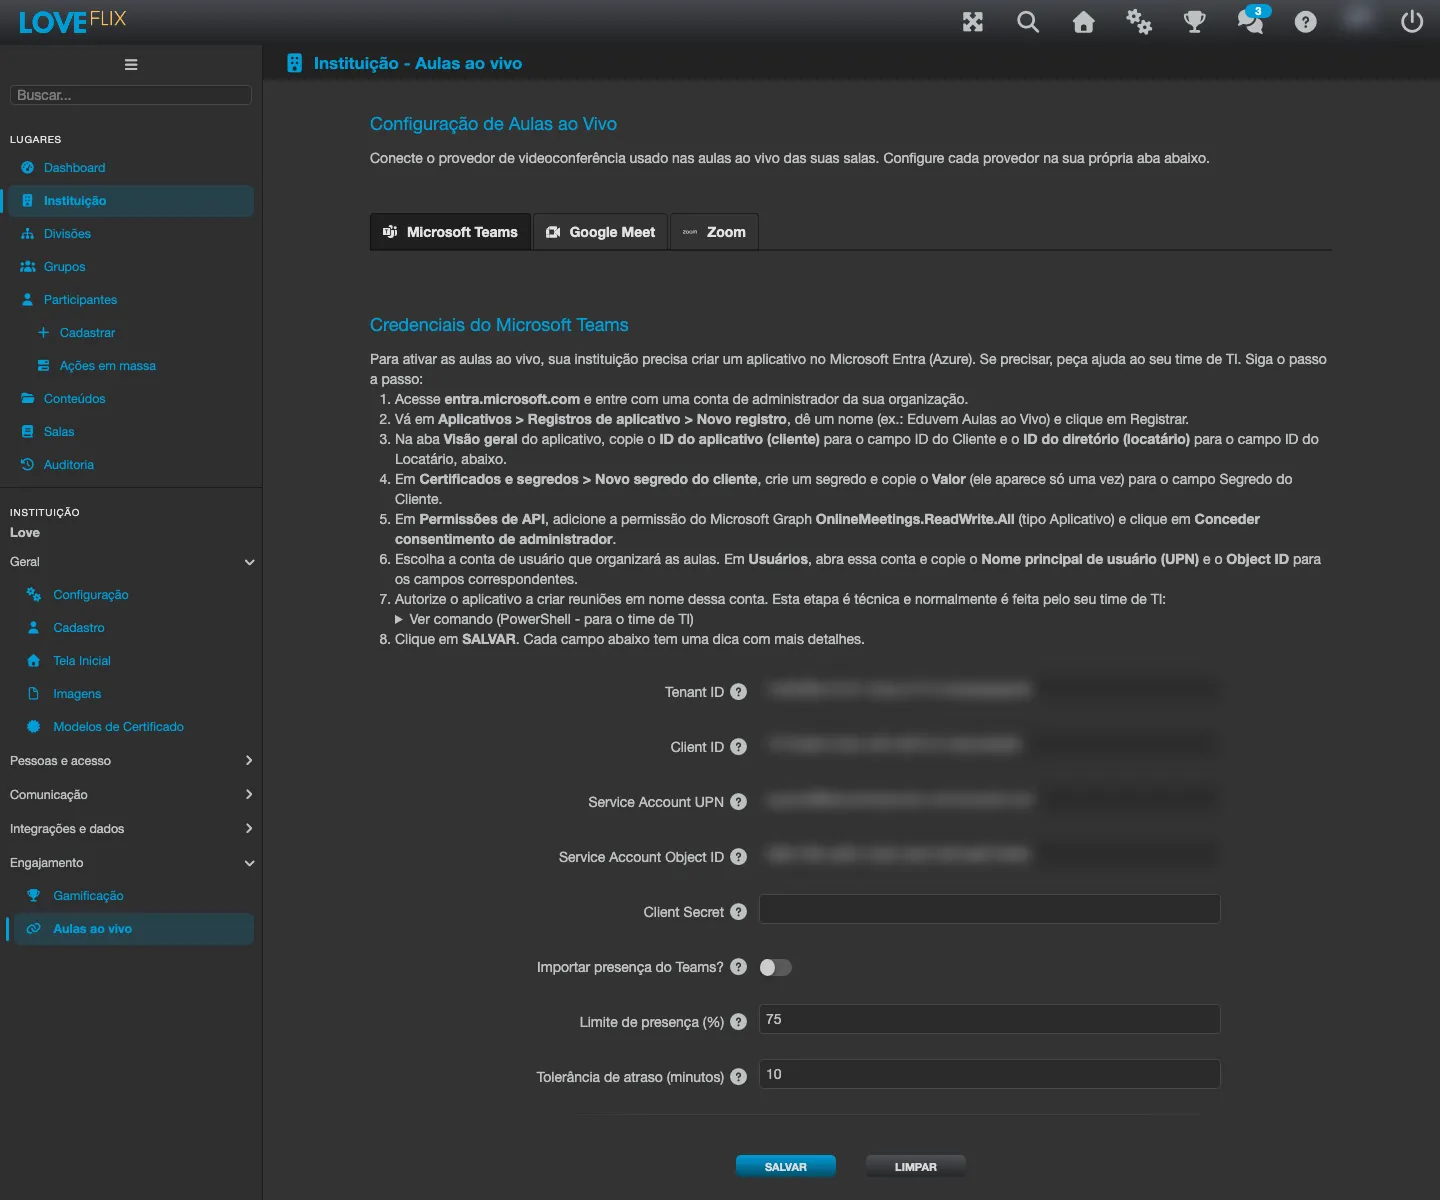
On the Microsoft Teams sub-tab (inside the institution’s Live Classes tab), five fields connect Eduvem to an app registered in your organization’s Azure AD / Microsoft Entra:
| Field | What it is |
|---|---|
| Client ID | The (client) app ID registered in Azure AD. |
| Client Secret | The app’s client secret. Leave it blank when editing to keep the secret already stored. |
| Tenant ID | The Azure AD directory (tenant) ID. |
| Service Account Object ID | The Object ID (a GUID) of the service account in Microsoft Entra used to create the meetings - copy it from Users > [the service account] > Object ID in the Entra portal. |
| Service Account UPN | The user principal name of the service account that hosts the live classes (for example, host@yourorganization.com). |
Configuring Google Meet (IT team)
Section titled “Configuring Google Meet (IT team)”Before filling in the fields, your IT team needs to set up the service account on Google. The full step-by-step appears right on Eduvem’s own screen, above the fields; in summary:
- In the Google Cloud Console, select or create a project.
- Under APIs & Services > Library, enable the Google Meet API. Without this, meeting creation fails even with the right credentials.
- Create a service account (no role is required) and generate a JSON key - the file can only be downloaded once.
- Copy the service account’s client ID.
- Under admin.google.com > Security > Access and data control > API controls > Domain-wide delegation, add that client ID with the scope
https://www.googleapis.com/auth/meetings.space.created. Without this step the service account exists, but cannot create meetings. - Choose the Workspace user who will be listed as the organizer (needs to be a real user of your domain, with a Google Meet license).
On the Google Meet sub-tab, three fields connect Eduvem to a service account on your organization’s Google Workspace (with domain-wide delegation for the meeting-creation scope):
| Field | What it is |
|---|---|
| Organizer Email | The Google Workspace user on whose behalf the meetings are created (for example, training@yourorganization.com). |
| Default Access Type | Trusted (participants knock and the host admits) or Open. |
| Service Account JSON | The service account’s JSON key file, pasted whole. It’s a write-only secret: after saving, the screen shows that a JSON is configured, but the content is never shown back. Leave it blank when editing to keep the one already stored. |
Configuring Zoom (IT team)
Section titled “Configuring Zoom (IT team)”Zoom uses a Server-to-Server OAuth app created in your own organization’s Zoom account - it’s not the same kind of app as a “Sign in with Zoom”, and it does not require anyone to authorize anything on each use.
- In the Zoom App Marketplace (
marketplace.zoom.us), with an administrator account, choose Develop > Build App and create an app of type Server-to-Server OAuth. - Copy the Account ID, the Client ID and the Client Secret the app displays.
- In the app’s permissions (Scopes), grant meeting creation and management (the
meeting:writefamily), and activate the app. - Choose the Zoom user who will be listed as the host - needs to be a real, licensed user on your Zoom account.
On the Zoom sub-tab, four fields connect Eduvem to that app:
| Field | What it is |
|---|---|
| Account ID | Your Zoom account’s identifier, shown by the Server-to-Server OAuth app. Not a secret. |
| Client ID | The app’s identifier. Not a secret. |
| Client Secret | The app’s secret. It’s a write-only secret: after saving, the screen only shows that a secret is configured, and the value is never shown back. Leave it blank when editing to keep the one already stored. |
| Host Email | The Zoom user on whose behalf the meetings are created (for example, training@yourorganization.com). |
Scheduling a live class
Section titled “Scheduling a live class”In the class, on the Live Classes tab > Schedule live class:
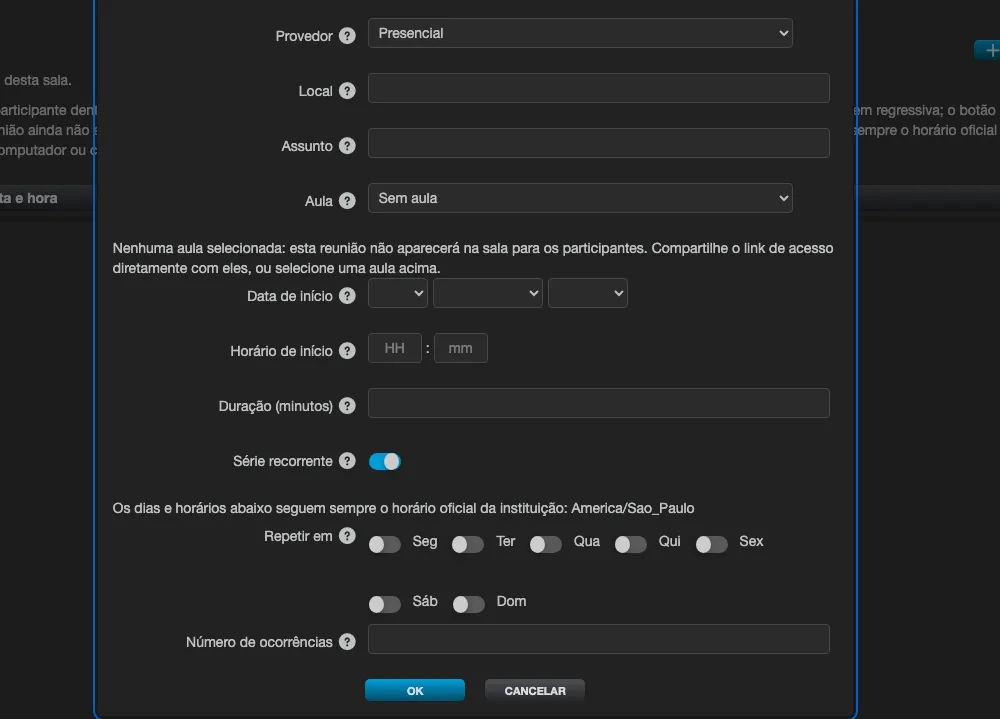
- Provider: which service hosts the meeting. The list shows only the providers already configured for the institution, plus External URL (always available). The provider cannot be changed later - to change it, cancel and schedule again.
- Meeting URL (External URL only): the
https://link participants use to join - for example, a fixed Webex room or a one-off link. - Subject: the title participants see in the class and on their own calendars.
- Lecture: the “Live Class” lecture (defined in the content editor) that this meeting fulfills - or No lecture, for a standalone meeting.
- Start date and time: in the institution’s time zone.
- Duration: in minutes, optional, up to 24 hours (1440 minutes).
In-person class (no video conferencing)
Section titled “In-person class (no video conferencing)”Requires the Allow roll call switch turned on for the institution - see Enabling. Without it, the In person option does not appear in the form.
Choose the In person provider when the meeting happens in a physical room. The form swaps the link field for Location:
- Location: the address or room where the class happens, for example
Room B-12, Central Block. It’s free text, not a link - the URL field from the other options would reject a room name. - The field is required for the In person provider.
No meeting is created with any provider: an in-person class has no link to join, and the participant sees the location instead of the access button.
Recurring series
Section titled “Recurring series”Requires the Allow roll call switch turned on for the institution - see Enabling. Without it, the Recurring series box does not appear and the class does not show the series section.
A class that repeats can be defined once instead of scheduled N times. In the scheduling form, turn on Recurring series and provide:
- Repeat on: the days of the week the class happens. At least one is required.
- Number of occurrences: how many times the class repeats, including the first one. The limit is 60: 60 is accepted and 61 is refused with “Enter a number of occurrences between 1 and 60.”
On save, the system creates a meeting for each occurrence. From then on they are ordinary live classes: they appear in the same table, the participant joins the same way, and nothing else on the platform needs to know they came from a series.
The Recurring series section lists the class’s series, with the Recurrence (the chosen days), the number of Occurrences and the state (Active or Cancelled).
Cancelling a series cancels all future occurrences at once; the ones that already happened are kept. The system asks for confirmation first. No occurrence is deleted: they start showing as Cancelled, so the roll call and the history keep pointing to them.
Recurring series are not available for the External URL provider - choose a video provider or In person.
The class’s meetings table shows the Provider column for each meeting. Editing a live class updates the meeting with the provider (when it’s Teams, Meet or Zoom); cancelling removes the meeting for every participant.
Importing meeting attendance
Section titled “Importing meeting attendance”Eduvem can fetch a Teams meeting’s attendance report after it ends and use that report to pre-fill the roll call for the linked session.
The setting lives on the same Teams screen and has three fields:
- Import attendance from Teams? - turns the feature on or off for the institution.
- Present threshold (%) - the percentage of the planned duration the participant must have attended to be suggested as Present (time is added up across reconnections; default 75).
- Late tolerance (minutes) - how many minutes after the planned start the first join is suggested as Late (default 10).
The import depends on the Teams service account having permission to read meetings’ attendance report. If import is turned on and nothing gets pre-filled, that’s the first thing to check with the IT team.
What the participant sees
Section titled “What the participant sees”Before the scheduled date, the participant sees the date, the time, a countdown and the meeting’s provider (Microsoft Teams, Google Meet, Zoom or External link); the join button only appears a few minutes before it starts (to avoid early access). While the meeting hasn’t been scheduled yet, the participant just sees a notice that the date will be set. The displayed states: Upcoming, About to start, Live now, Ended, Recording available.
Enabling
Section titled “Enabling”- To use Teams, Meet or Zoom, your IT team fills in the credentials on the corresponding sub-tab of the institution’s Live Classes tab. To use only external links, no configuration is needed.
- Create a test piece of content with a “Live Class” lecture, schedule the meeting in a test class, and validate the flow with a small group before opening it up to everyone.